A compass is a small handheld navigation tool with a magnetized needle that always swings around to point at magnetic north, and it’s been getting hikers, sailors, and soldiers where they need to go for centuries now. No batteries, no signal bars, nothing to charge overnight — it just works. Learning how to use a compass properly really comes down to a handful of core skills: reading the needle, taking a bearing, and lining it up with a map when there’s one handy.
Big names in the outdoor world — Suunto, Silva, Brunton, Cammenga, Coghlan’s — all build their compasses around this same basic idea, even though the housings and extra bells and whistles look a bit different brand to brand. This guide walks through the actual technique step by step, then covers finding north, navigating without a map, adjusting for declination, and the questions people search for most.
One quick note before jumping in: this guide covers the classic navigation compass, the kind used for hiking, orienteering, and land nav — not the drawing tool from geometry class used for sketching circles. If that’s actually what brought someone here, good news: the technique’s a lot simpler, and there’s a quick answer waiting in the FAQ section below.
This guide is part of our growing library of step-by-step how-tos — you can read more about how we put these together on our About Us page.
How to Use a Compass: Step-by-Step
This is the core technique behind pretty much every baseplate compass out there, and honestly, it’s the same handful of moves whether someone’s plotting a route through the backcountry or just trying to figure out which way home is from the trailhead.
Step 1: Hold the compass flat and level.
Rest it in the palm of a hand, roughly at chest height, base perfectly flat. Even a slight tilt can throw off how the needle swings.
Step 2: Point the direction-of-travel arrow where you actually want to go.
This is the arrow printed right on the baseplate — not the magnetic needle, that’s a different thing entirely. Aim it straight at wherever the destination is, whether that’s a landmark off in the distance or a point marked on a map.
Step 3: Rotate the bezel until the orienting arrow lines up with the needle.
Turn the dial — the rotating ring with all the degree markings — until the outlined orienting arrow sits directly under the red end of the magnetic needle. People call this “boxing the needle,” and it’s genuinely the step that trips up almost everyone the first few times they try it.
Step 4: Read the bearing.
Once that needle’s boxed, look at the number sitting where the direction-of-travel arrow meets the bezel. That number, in degrees, is the bearing — the exact direction to start walking.
Step 5: Keep the direction-of-travel arrow pointed forward as you walk.
Don’t try to stare at the compass the entire time while walking — that never works well. Pick a landmark sitting directly along that bearing, walk to it, then check again and repeat.
The short version, for anyone skimming:
Hold it flat, point the travel arrow at the target, box the needle by turning the bezel, read the bearing, then walk toward a landmark on that line.
What Is a Compass and How Does It Work?
Underneath the housing, a compass is really just a lightweight magnetized needle balanced on a nearly frictionless pivot, sitting inside a small capsule usually filled with liquid to keep it from wobbling around too much. The Earth itself behaves like one giant, slightly messy magnet — thanks to all that molten iron churning away deep in its core — and that magnetic field is exactly what pulls the needle around until it settles pointing toward magnetic north.
Here’s the part that trips up a lot of people early on: magnetic north and true north (the actual geographic North Pole) aren’t the same spot. Close, but not the same. That gap between them, called declination, shifts depending on where someone’s actually standing on the planet. It matters more than it sounds like it should, and there’s a full section on it further down worth reading.
Parts of a Compass (Quick Overview)
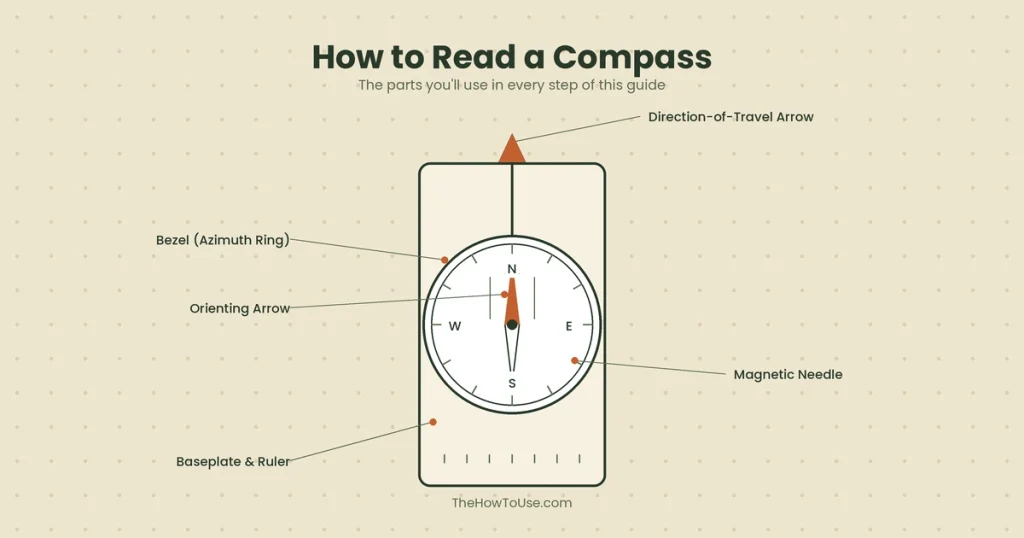
Every step above leans on a handful of physical parts, so it helps to know what’s actually being pointed, turned, and read at each stage.
Baseplate and Ruler
The clear plastic base everything else sits on top of. Being see-through means a map can slide right underneath it, and the ruler markings along the edge come in handy once a route’s actually being plotted.
Bezel (Azimuth Ring)
The rotating dial marked out in degrees, 0 through 360. Twisting it is really the whole mechanism behind setting or reading a bearing.
Direction-of-Travel Arrow
Printed right on the baseplate itself, this arrow shows which way to physically walk. It never moves on its own — the entire compass has to get pointed instead.
Orienting Arrow and Magnetic Needle
The orienting arrow is printed inside the bezel and turns along with it. The magnetic needle, though, floats freely and always points to magnetic north no matter which way that bezel gets spun. Lining these two up is basically the entire trick behind reading a bearing correctly.
Types of Compasses
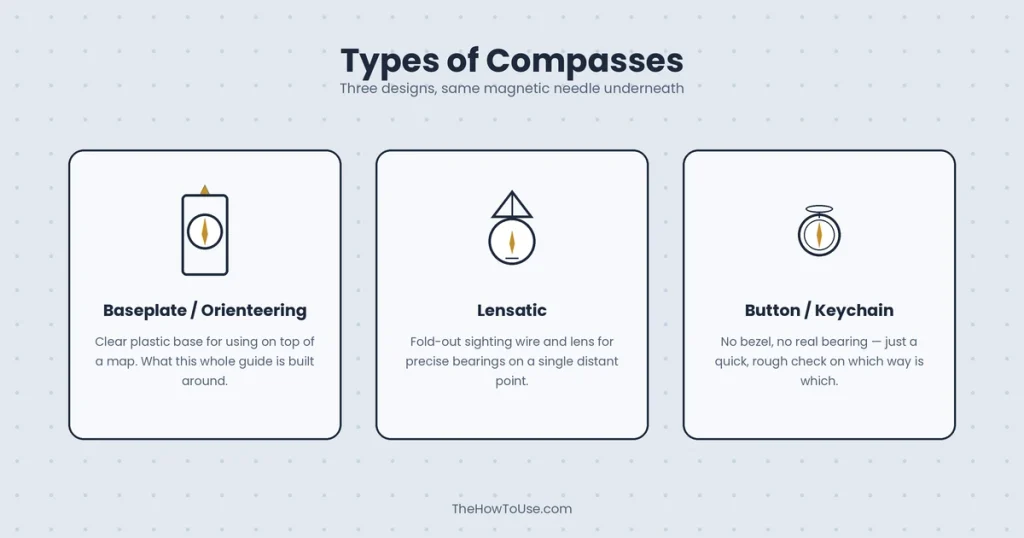
Not every compass looks or works quite the same way, and it’s worth knowing which kind is actually in hand before assuming the steps above apply exactly as written.
Baseplate / Orienteering Compass
The clear, ruler-edged type most hikers reach for, and the one this whole guide is built around. Easy to use with a paper map, since that see-through base sits right on top of it without blocking anything.
Lensatic Compass
The rugged, military-style compass with a fold-out sighting wire and a small magnifying lens for reading precise bearings. Slower to use than a baseplate compass, but it tends to be more accurate when sighting a distant, specific point.
Button / Keychain Compass
Tiny, no-frills, mostly there as a backup or a rough direction check rather than for anything serious. No bezel to rotate on these, so a formal bearing isn’t really possible.
How to Use a Compass to Find North
This is probably the single most common reason anyone picks up a compass in the first place, and it’s genuinely the simplest thing it does.
Hold the compass flat and level, then rotate your whole body — not the bezel, the body — until the red end of the magnetic needle lines up with the “N” printed at the top of the bezel. Once that needle’s sitting right over the N, whatever direction the direction-of-travel arrow happens to be pointing is north. That’s really it. No bearing to work out, no map needed, just turning until the needle settles where it should.
One small catch worth remembering, though: this points to magnetic north, not true north. For everyday orientation — figuring out which way leads back to the trailhead, say — that tiny gap almost never matters. For precise navigation, that’s exactly why declination gets its own section later on.
How to Take a Bearing
Taking a bearing is really just the formal version of “pick a direction and remember it,” and it’s the one skill everything else in orienteering ends up building on.
To take a bearing on something actually visible — a distant peak, a tower, whatever’s out there — hold the compass flat and point the direction-of-travel arrow straight at it. Without moving the baseplate at all, rotate the bezel until the orienting arrow boxes the magnetic needle. Read the number sitting at the index line where the travel arrow meets the bezel — that’s the bearing, and it can get written down or just kept in mind for the walk ahead.
Following that bearing later works the same way, just in reverse: hold the compass level, rotate the whole body (not the bezel this time) until the needle’s boxed inside the orienting arrow again, and the travel arrow ends up pointing exactly where it was aimed the first time around. This is also how a “back bearing” works for retracing steps — add or subtract 180 degrees from the original bearing, and that’s the route back.
How to Use a Compass With a Map
This is where a compass really earns its keep. A bearing on its own is just a direction, but a bearing tied to an actual map turns into a real route somewhere.
Orienting the map first:
Lay the map flat and set the compass right on top of it, lining up the compass’s straight edge with the map’s north-south grid lines. Holding both together, rotate the map — not the compass — until the magnetic needle points to magnetic north, adjusted for local declination if precision actually matters for the trip. The map’s now physically facing the same direction as the real landscape around it, which makes matching up hills, trails, and landmarks a whole lot more intuitive than squinting at a map facing the wrong way.
Plotting a bearing from the map:
Find the current position and the destination on the map, then lay the compass’s edge so it connects the two points, a travel arrow pointing toward the destination. Without shifting the baseplate, rotate the bezel until the orienting lines inside it match up with the map’s own north-south grid lines, and the orienting arrow’s pointing to map north. Lift the compass off the map, hold it flat, and rotate the whole body until the needle boxes inside the orienting arrow — the travel arrow’s now pointing the way to actually walk.
How to Use a Compass Without a Map
Not every hike involves pulling out a paper map every ten minutes, and honestly, plenty of basic navigation happens with nothing but the compass itself.
The simplest version is landmark-to-landmark travel: take a bearing on something visible up ahead, walk toward it, then take a fresh bearing once there. Chain that a few times and it keeps a hiker roughly on course with zero map in hand. For longer stretches with no visible landmarks — thick woods, flat open terrain, that sort of thing — there’s a rougher technique called dead reckoning: pick a bearing, estimate a walking pace, and track distance by counting steps or timing the walk, updating position along the way. Nowhere near GPS-level precise, sure, but genuinely enough to keep from wandering in circles out there.
Understanding Declination: True North vs. Magnetic North
Declination is the angle between magnetic north — where the needle actually points — and true north, the real geographic North Pole. It changes depending on location; in some places it’s barely a degree or two, and in others it can swing past 15 or 20 degrees.
For casual use, this difference rarely matters much at all. For serious backcountry navigation with a topographic map, though, ignoring it can send someone meaningfully off course over a long enough distance. Topo maps usually print the local declination value right in the legend, and most baseplate compasses have a small adjustable declination scale or screw that lets that offset get dialed in once — after that, it’s automatically factored into every bearing taken from then on. Set it once for a region, and there’s no need to think about it again until traveling somewhere far enough away that the value shifts.
How to Use a Compass for Kids
Teaching a kid the basics doesn’t need to involve declination or dead reckoning at all — keeping it simple works a lot better, and it’s honestly a genuinely fun skill for them to pick up.
Start with just finding north, since that’s the easiest win going: hand them the compass, show them how to turn their body until the needle lines up with the N, and let them point out which way is which around the yard or a park. From there, a simple “walk to the tree, then take a new bearing to the fence” game builds the landmark-to-landmark habit without any map getting involved at all. Scouting programs teach exactly this same progression for a reason — it works, and kids tend to pick up the needle-boxing motion faster than most adults expect them to.
Common Compass Mistakes to Avoid
A few habits show up again and again with people just starting out, and every single one of them is an easy fix once someone points it out.
Following the magnetic needle instead of the direction-of-travel arrow is probably the most common mix-up out there — do that, and a hiker just ends up walking north no matter what bearing they meant to follow. Not holding the compass level is another one, since even a slight tilt can drag the needle off its true swing. Standing too close to metal objects, phones, or belt buckles throws off the reading too, since all of that messes with the magnetic field the needle’s trying to read. And skipping the declination adjustment on a long backcountry trip, while rarely a disaster over short distances, can compound into a real navigation error the farther someone travels out there.
Watch: How to Use a Compass (Video Guide)
Written steps only get someone so far, and plenty of people find the needle-boxing motion clicks a lot faster after actually watching it happen once. Organizations like REI’s Outdoor School and various Scouting programs put out free demonstration videos walking through the full baseplate compass technique, bearing-taking included. Pairing one of those alongside this guide is a solid way to double-check that each step — boxing the needle, reading the bearing, orienting the map — is actually landing the way it should.
Frequently Asked Questions
Is this the same as the compass used in geometry?
Nope, and it’s a mix-up that happens a lot. A geometry compass is a small drawing tool with two hinged legs, used for sketching circles and arcs on paper. A navigation compass — the kind this whole guide covers — uses a magnetized needle to find direction instead. Same word, two completely different tools.
How do I use a compass to find north quickly, without all the bearing steps?
Just hold it flat and rotate your body until the red end of the needle lines up with the N on the bezel. Wherever the direction-of-travel arrow’s pointing at that moment is north.
Can I use a compass without a map at all?
Yep. Landmark-to-landmark navigation — taking a bearing on something visible, walking to it, then re-checking — works fine without ever pulling out a map, though a map obviously adds a lot more precision over longer routes.
Is a compass still accurate near a phone or other metal objects?
Not really, no. Phones, keys, belt buckles, anything metal or magnetized sitting close by can pull the needle off its true reading. Worth holding it away from pockets and gear before trusting a bearing.
What’s the difference between a baseplate compass and a lensatic compass?
A baseplate compass is the clear, ruler-edged type most people use with paper maps, and it’s what most of this guide is built around. A lensatic compass is the rugged, fold-out military style with a sighting wire and magnifying lens, generally used for more precise sighting on one distant point rather than for map work.
Is there a printable cheat sheet for the basic steps?
Not yet on this site, but honestly the five-step sequence up in the “How to Use a Compass: Step-by-Step” section is short enough to jot onto an index card before a hike — hold flat, point the arrow, box the needle, read the bearing, walk to a landmark.
Key Takeaways
Reading a compass really comes down to two things clicking into place: knowing that the direction-of-travel arrow — not the needle — shows where to actually walk, and getting comfortable “boxing” the needle inside the orienting arrow every single time a bearing needs reading. Everything else — using it with a map, adjusting for declination, navigating landmark to landmark without one — just builds on that same core motion. Takes a bit of practice before it feels natural, sure, but once it does, a compass turns into one of the most dependable tools in any hiking pack, precisely because it never needs a battery or a signal to actually work.
Head back to the homepage to browse more no-fluff guides across every category