
A multimeter is a handheld electrical testing tool that measures voltage, resistance, and current, and it’s basically the first thing anyone doing electrical work, electronics tinkering, or basic car troubleshooting needs to get comfortable with. It goes by a few other names too — volt-ohm meter, multi-tester, or just “tester” — and brands like Fluke, Klein Tools, Innova, and AstroAI all build theirs around the same basic idea, even if the buttons and dial layouts look a bit different from one to the next.
Learning how to use a multimeter really comes down to a handful of things: picking the right function, getting the probes into the right ports, and reading whatever shows up on the display. This guide walks through the actual technique step by step, then breaks down voltage, resistance, continuity, car battery testing, and the questions people search for most.
One quick note before jumping in: this isn’t the same tool as a clamp meter, which measures current by clamping around a wire instead of touching probes to it. If that’s actually what someone’s after, there’s a quick answer on that down in the FAQ.
Head back to the homepage to browse more no-fluff guides across every category.
How to Use a Multimeter: Step-by-Step
This is the universal setup that applies no matter what’s actually being measured — voltage, resistance, whatever the case. Get comfortable with this part first, since every specific measurement further down in this guide builds right on top of it.
Step 1: Do a quick safety check first.
Look over the probes and cables for cracks, exposed wire, anything that looks off before touching anything live. A damaged probe is a bad time waiting to happen, honestly.
Step 2: Select the function on the dial.
Turn the selector to whatever’s being measured — voltage (V), resistance (Ω), or continuity (usually a little sound-wave icon). If it’s a manual-ranging meter, this is also where a range gets picked, and there’s more on that a bit further down.
Step 3: Plug the probes into the correct ports.
Black probe always goes into the port labeled COM, no exceptions. The red probe goes into whichever port matches what’s being measured — usually labeled VΩmA for most everyday tasks, or a separate 10A port for bigger current readings. Getting this one wrong is genuinely the most common mistake people make, and it’s covered in more detail down in the mistakes section.
Step 4: Touch the probes to the test points.
Black to negative or ground, red to positive or whatever’s being tested. For resistance or continuity, it usually doesn’t matter which probe goes where.
Step 5: Read the display.
The number that pops up is the measurement, in whatever unit matches the function selected — volts, ohms, or amps.
The short version, for anyone skimming:
Check the probes, pick the function, plug red and black into the right ports, touch the test points, read the number.
What Is a Multimeter and How Does It Work?
Underneath the casing, a multimeter’s really just a few measurement circuits bundled into one tool, switched between by that selector dial. Older analog versions used a moving needle sweeping across a printed scale to show the reading, while digital multimeters — the kind almost everyone reaches for now — just show a number straight on an LCD screen, which is a lot easier to read at a glance and a lot harder to misjudge.
At its core, the tool’s really only ever doing one of three things: measuring the electrical pressure pushing current through a circuit (voltage), measuring how much that circuit resists the flow of current (resistance), or measuring the actual flow of current itself (amperage). Most everyday use — checking a battery, testing an outlet, tracking down a broken wire — really only touches the first two, if we’re being honest.
Parts of a Multimeter (Quick Overview)
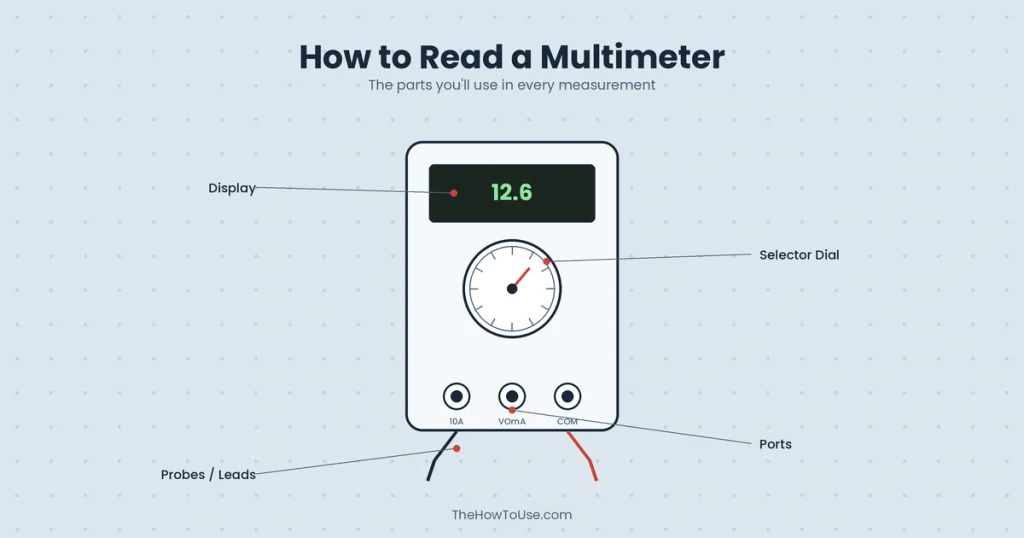
A few physical parts show up again and again through every step in this guide, so it’s worth knowing what each one actually does before diving further in.
Display
Where the reading shows up. Digital meters use an LCD screen; analog ones use a needle sweeping across a printed scale instead.
Selector Dial
The rotating switch used to pick what’s actually being measured — voltage, resistance, continuity, sometimes current too on fancier models
Ports
Most multimeters have three of these: COM for the black probe, always. VΩmA for the red probe on most everyday measurements. And a separate 10A port for the red probe when measuring bigger currents that would otherwise blow a fuse.
Probes / Test Leads
The two wires with metal tips — one red, one black — that actually touch whatever’s being tested. Cheap probes wear out and crack over time, and honestly, it’s worth swapping them out well before that becomes a safety issue.
Understanding Multimeter Symbols
The dial on a typical multimeter is genuinely covered in symbols that mean absolutely nothing to a beginner at first glance, so a quick decoder goes a long way here.
A V with a straight line next to it means DC voltage — direct current, the kind batteries and most electronics run on. A V with a wavy or squiggly line means AC voltage instead, the kind coming out of wall outlets. That horseshoe-looking symbol, Ω, stands for ohms and represents resistance. A small sound-wave or speaker-ish icon usually marks the continuity setting, since most meters beep once they detect a complete circuit. And a symbol that looks like an arrow running into a line — resembling a diode — marks the diode-test function, handy for checking one-way electronic components.
Not every meter uses the exact same icons across the board, but this covers what shows up on the vast majority of both cheap and professional models, Fluke included.
This guide is part of our growing library of step-by-step how-tos — you can read more about how we put these together on our About Us page
Types of Multimeters
Not every multimeter works quite the same way under the hood, and it’s worth knowing which kind is actually in hand before assuming a reading’s accurate.
Digital (DMM)
Short for digital multimeter, and by far the most common type out there today. Shows a clean numeric reading, and most models now auto-range too, which takes a lot of the guesswork out for beginners.
Analog
The older style, with a moving needle sweeping across a printed scale. Some electricians still like these for spotting quick trends — a slowly rising or falling reading is easier to catch as motion than as changing digits — but they’re genuinely harder to read with any precision.
Auto-Ranging vs. Manual-Ranging
An auto-ranging meter figures out the right measurement range on its own — just pick voltage or resistance, and it handles the rest from there. A manual-ranging meter needs that range picked by hand instead (say, choosing 20V instead of 200V), which takes a bit more know-how but usually costs less at checkout.

How to Measure DC Voltage (Batteries, Car Batteries, 12V Systems)
This is probably the single most common reason anyone reaches for a multimeter in the first place, honestly — checking whether a battery’s actually dead or still has some life left in it.
Set the dial to DC voltage (the V with the straight line), and if it’s a manual-ranging meter, pick a range higher than whatever’s expected — 20V for a standard 12V car battery works fine. Plug the black probe into COM and the red probe into VΩmA. Touch black to the negative terminal, red to the positive terminal. A healthy AA battery should read somewhere around 1.5V, and a healthy 12V car battery usually lands somewhere between 12.4V and 12.7V with the engine off. Anything noticeably lower than that usually points to a battery that’s weak or on its way out the door.
How to Measure AC Voltage (Outlets & Household Circuits)
This one comes with a bigger safety warning attached, since household outlets carry more than enough current to genuinely hurt someone if handled carelessly.
Set the dial to AC voltage (the V with the wavy line). Plug the black probe into COM and the red into VΩmA, same setup as before. Carefully slide the black probe into the shorter (or ground) slot and the red probe into the other slot of the outlet, keeping fingers well clear of the metal tips the whole time.
A standard North American outlet should read somewhere close to 120V; a reading that’s noticeably lower or bouncing around can point to a wiring issue worth having a licensed electrician take a look at. If there’s ever a moment of hesitation about doing this safely, that hesitation’s worth listening to — outlet testing is exactly where beginners should be most careful, no shortcuts here.
How to Measure Resistance (Ohms)
Resistance measures how much a component pushes back against the flow of current, and it’s genuinely useful for testing things like resistors, heating elements, or fuses.
Important first step, and it’s an easy one to forget: make sure whatever’s being tested is completely disconnected from any power source before measuring resistance — testing a live circuit this way can actually damage the meter. Set the dial to the Ω symbol, black probe into COM, red into VΩmA, then touch a probe to each end of the component. The display shows the resistance in ohms. A reading of “OL,” or an infinity symbol, usually means the circuit’s broken somewhere along the line, or the range picked is too low for what’s actually being measured.
How to Test Continuity
Continuity testing answers one pretty simple question: is there an unbroken path for electricity to flow between two points? It’s genuinely the fastest way to check a fuse, a wire, or a switch without doing any math at all.
Set the dial to the continuity symbol — usually that small sound-wave icon — and again, make sure whatever’s being tested has no power running to it first. Touch one probe to each end of the wire, fuse, or connection in question. A beep means the path’s complete and electricity can flow through; silence, or an “OL” reading, means there’s a break somewhere along the line. It’s a genuinely satisfying little test once it clicks, since that beep means there’s no need to even glance down at the display.
How to Use a Multimeter on a Car (Beyond the Battery)
A multimeter’s usefulness in a car goes well past just checking whether the battery’s dead, for what it’s worth.
Testing a fuse works through continuity — pull the fuse, set the dial to continuity, touch a probe to each metal end. A beep means it’s still good, silence means it’s blown. Checking the alternator’s output uses the same DC voltage steps covered above, but this time with the engine running: a healthy alternator should push that reading up to somewhere around 13.5V to 14.5V, noticeably higher than the resting battery voltage. If it’s not climbing into that range with the engine on, that’s usually a sign the alternator isn’t charging the battery the way it should be.
Common Multimeter Mistakes and Safety Warnings
A handful of mistakes show up over and over with beginners, and a couple of them are genuinely dangerous rather than just annoying.
Plugging the red probe into the wrong port is the big one — trying to measure voltage while the probe’s still sitting in the 10A port from a previous current measurement can blow the meter’s internal fuse, or worse, create a short. Forgetting to disconnect power before measuring resistance or continuity is another common slip-up, since it can fry the meter’s internal circuitry pretty quickly.
Using the wrong function entirely — say, measuring AC voltage while the dial’s still set to DC — gives a reading that looks perfectly plausible but is completely wrong, which is arguably worse than getting no reading at all. And touching the metal tips of the probes while testing live current is a real shock risk worth taking seriously every single time, not just when it happens to feel risky in the moment.
Watch: How to Use a Multimeter (Video Guide)
Some of this genuinely clicks faster after watching someone actually do it once. Fluke and SparkFun both put out solid, official demonstration videos walking through the core measurements — voltage, resistance, continuity — start to finish. Pairing one of those alongside this guide is a good way to double-check that probe placement and port selection are landing the way they should before trying it solo.
Frequently Asked Questions
Is a multimeter the same thing as a clamp meter?
Nope, though people mix them up all the time. A multimeter measures current by being placed directly in the circuit with probes touching the test points, while a clamp meter measures current by clamping around a wire without breaking the circuit open at all. Clamp meters tend to be handier for high-current measurements where breaking the circuit just isn’t practical.
Should a beginner get a digital or analog multimeter?
Digital, pretty much every time. That numeric display is far easier to read accurately, and most digital models now auto-range too, which cuts out a layer of guesswork that trips up a lot of first-timers on analog meters.
Is there a PDF or printable guide for the basic steps?
Not yet on this site, but honestly, the five-step sequence up in the “How to Use a Multimeter: Step-by-Step” section is short enough to screenshot or jot down before starting a project — safety check, select the function, plug in the right ports, touch the test points, read the display.
What does “DMM” mean?
Just stands for digital multimeter — the same thing referred to throughout most of this guide, and the most common type sold today by a wide margin.
Is a Fluke multimeter worth the higher price for a beginner?
Fluke’s reputation is well earned — their meters are known for accuracy and durability, and professionals lean on them for good reason. That said, a beginner just learning the basics on household batteries and outlets can absolutely start with a cheaper meter and upgrade later once the fundamentals feel more comfortable.
Can a multimeter test a 12V car battery?
Yes, and it’s actually one of the most common uses for one. Set it to DC voltage, touch the probes to the terminals as described above, and a reading between 12.4V and 12.7V with the engine off generally means the battery’s in good shape.
Key Takeaways
Reading a multimeter really comes down to three things clicking into place: picking the right function on the dial, getting the probes into the correct ports, and knowing what a normal reading actually looks like for whatever’s being tested. Voltage, resistance, and continuity each have their own small setup, sure, but they all lean on that same core routine covered at the top of this guide. Takes a little practice before probe placement feels automatic, but once it does, a multimeter turns into one of the most genuinely useful troubleshooting tools around — for a dead car battery, a blown fuse, or just figuring out whether an outlet’s actually working at all.