

A rice cooker is a small electric kitchen appliance that cooks rice on its own. That’s really the whole pitch — no stirring, no watching, no standing over a pot guessing whether it’s done yet. It heats a measured amount of rice and water inside a sealed pot until the liquid disappears into the grains, then switches itself over to “keep warm” without anyone touching it.
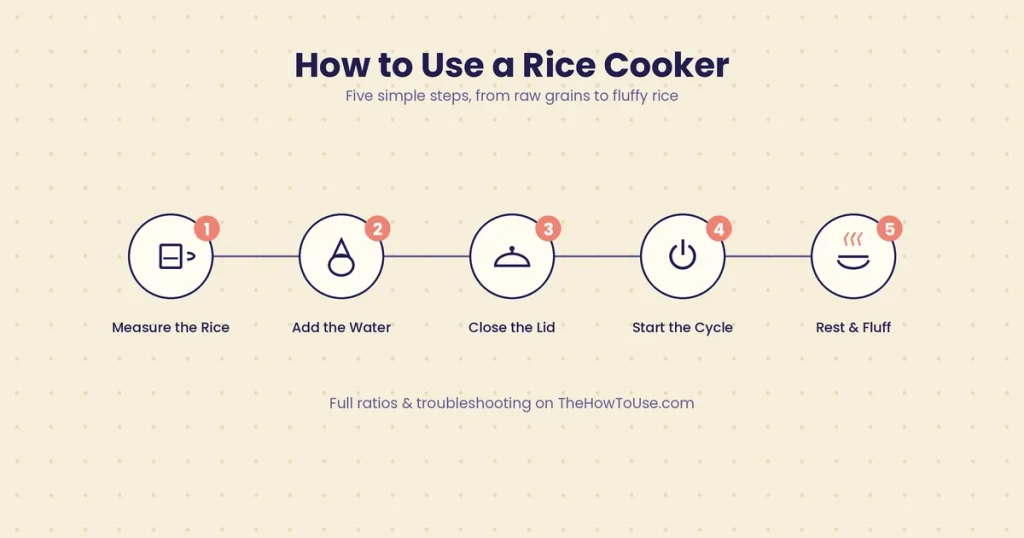
Learning how to use a rice cooker basically comes down to five things: measuring the rice properly, getting the water ratio right, closing the lid, starting the cycle, and letting the rice sit for a few minutes before anyone digs in. Get those five right and the machine takes care of everything else. Fluffy rice, nothing burnt on the bottom, no hovering required.
Probably explains why these ended up on so many kitchen counters in the first place. And yet — plenty of people still get inconsistent results out of theirs. Gummy one day, undercooked the next, and no real idea why. Truth is, it’s rarely the machine’s fault. Usually it’s one small habit nobody’s noticed they’re repeating, or a step that got skipped because it felt optional at the time. This guide walks through the whole thing: what’s different the very first time it’s out of the box, the ratios that shift depending on which rice is going in, the mistakes behind most bad batches, and a couple of things a rice cooker can do that most people never think to try.
This guide is part of our growing library of no-fluff how-to guides — you can read more about how we put these together on our About us page.
What Is a Rice Cooker and How Does It Work?
The mechanics are simpler than they look, honestly. Water boils at 100°C (212°F) and just sits there at that exact temperature the whole time there’s still liquid left in the pot. The moment all that water gets absorbed into the rice, though, the temperature inside starts climbing past boiling — and a sensor near the base picks up on that shift and flips the cooker from “cook” to “keep warm” all by itself. No timer to set. No clock-watching. No standing over a stove.
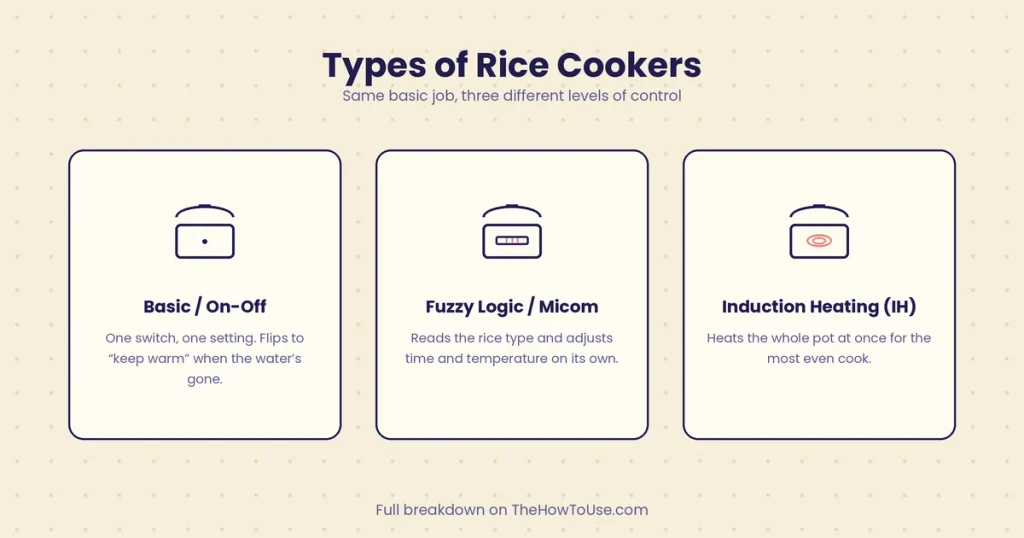
Basic models run on a single switch with one setting, and that covers most people’s everyday white rice needs just fine, honestly. The pricier “fuzzy logic” or induction models adjust temperature and timing based on whatever rice variety gets selected, which helps a lot with trickier grains like brown rice or sushi rice. Some throw in presets for porridge, steaming, even slow cooking — at which point it’s basically blurring into a small multi-cooker. Zojirushi, Aroma, Russell Hobbs, whichever brand — they all handle the fine details a little differently, but the core process stays pretty much the same across the board. So everything below applies whether it’s a bare-bones model or one covered in a dozen buttons.
Why bother with a rice cooker over just using the stovetop, though? Stovetop rice needs babysitting. The heat has to come down at exactly the right moment, then there’s that last stretch of hovering to make sure nothing scorches. A rice cooker sidesteps all of that by reacting to what’s actually happening inside the pot instead of running off some fixed timer. That’s probably the real reason people keep one around, even in kitchens that already have a perfectly good stove sitting right there.
How to Use a Rice Cooker: Step-by-Step
Step 1: Measure the Rice
Most rice cookers come with their own little plastic measuring cup, and it genuinely matters to use that specific one instead of grabbing whatever measuring cup happens to be in the drawer. Here’s the part almost everyone misses: a rice cooker cup holds about 180 milliliters, while a standard U.S. cup holds 237. Those lines etched inside the pot are calibrated for the cooker’s own cup — not a regular one. Mixing the two up without realizing it is one of the sneakier reasons rice turns out too wet or too dry.
Lost the cup somewhere along the way? A regular measuring cup still works fine. Just stay consistent about it — use that same cup for both the rice and the water rather than switching partway through. Rough guide, for what it’s worth: one rice cooker cup of dry rice feeds around two to three people.
Step 2: Rinse the Rice (Optional, But Worth Doing)
Rinsing isn’t mandatory. It does make a real difference for most rice types, though. Swishing the rice around in a bowl of cool water, then pouring off that cloudy water, washes away surface starch that would otherwise leave the finished rice gummier and more prone to clumping together. Two or three rounds — until the water runs mostly clear — is usually enough. Rice labeled “no-rinse” or pre-washed is the one exception here; that can go straight into the pot, no fussing required.
Step 3: Add the Rice and Water in the Right Ratio
This is where the real differences between rice types actually show up (full chart on that a bit further down). As a rough starting point, most white rice wants roughly equal parts rice and water, while brown rice needs closer to double the water and a good chunk more cook time on top of that.
Handy shortcut, if the inner pot’s got one: most have measurement lines molded right into the side of the pot. Line the rice up with the “2,” say, then fill water to that same “2” line — no separate cup needed at that point. Only works, though, if the rice itself got measured with the cooker’s own cup to begin with. Skip that step and the shortcut falls apart.
Step 4: Close the Lid and Start the Cooking Cycle
Rice and water are in — now close the lid all the way and either hit start or flip the switch, depending on the model. A light usually clicks on somewhere to confirm it’s actually running. From here on, just leave it alone. Cracking the lid open partway through lets out steam the rice genuinely needs, and it can leave part of the batch undercooked as a result.
Step 5: Wait for the Signal
Every cooker signals a little differently. Some beep. Some clicks. Most just flip a light or a lever over to “keep warm” without any fanfare at all. Whatever the signal happens to be on a given model, that’s the cue that the water’s fully absorbed and the rice is, technically, done.
Step 6: Let It Rest
This is the step people skip most — and it’s the one that actually matters more than it gets credit for. Leaving the rice untouched on a keep-warm for 10 to 15 minutes lets whatever moisture’s left redistribute through the grains instead of just pooling at the bottom of the pot. Fluff it right off the cook cycle, skip that rest entirely, and it comes out noticeably wetter and clumpier than rice given even a short pause.
Step 7: Fluff and Serve
Open the lid and fluff with a rice paddle or wooden spoon — not metal, since that scratches up the non-stick coating most inner pots have. A light lifting-and-turning motion separates the grains without smashing them into mush. If the keep-warm function on the cooker is any good, the rice can usually sit at serving temperature for a couple hours without drying out, which is genuinely handy when the rest of dinner isn’t quite ready at the same time.
Rice-to-Water Ratio Chart (By Rice Type)
How much water counts as “right” depends a lot on which rice is actually going into the pot — and this is exactly where a lot of general advice falls apart, since most guides only ever bother covering plain white rice. The rice to water ratio table below is a decent starting point for the varieties people cook most often:
| Rice Type | Water Ratio (per 1 cup rice) | Approx. Cook Time |
| White rice (long grain) | 1 : 1 | 20–25 minutes |
| Jasmine rice | 1 : 1 | 20–25 minutes |
| Basmati rice | 1 : 1.25 | 20–25 minutes |
| Brown rice | 1 : 2 | 40–50 minutes |
| Sushi rice | 1 : 1.1 | 20–25 minutes |
| Sticky (glutinous) rice | 1 : 1, after soaking | 25–30 minutes |
| Quinoa (bonus grain) | 1 : 1.5 | 15–20 minutes |
Treat these as a starting point, not gospel carved in stone somewhere. Rice age, altitude, even personal taste can nudge the ideal ratio a touch one direction or the other. Some people like their rice a bit firmer and cut the water slightly; others like it softer and splash in a bit more. A few batches in, most people land on small tweaks that just become second nature without even thinking about it — nobody gets it perfect on the first try, and honestly, that’s fine.
Tips for Perfect Rice Every Time
A handful of small habits separate the good batches from the occasional letdown.
Swap in broth instead of water once the basic process feels comfortable — chicken or vegetable broth adds a surprising amount of flavor to otherwise plain white rice. A small pat of butter or a teaspoon of oil before cooking cuts down on sticking, especially on an older cooker whose non-stick coating has seen better days. Season with salt before cooking rather than after; about half a teaspoon per cup of dry rice is a reasonable place to start, though tastes obviously vary.
A few more worth keeping in the back of your mind: resist the urge to peek, since lifting the lid mid-cycle is one of the most common habits behind uneven cooking — it lets steam escape right when the rice needs it most. Stick to one cup for measuring both rice and water, every time, instead of switching between the included cup and a random one halfway through. Give older rice a few extra minutes to rest, too.
Rice that’s been sitting in the pantry for months tends to run drier than fresher rice, and a slightly longer rest helps it finish absorbing moisture evenly. And it’s worth wiping out the inner pot before adding rice even when it looks perfectly clean already — leftover moisture or oil from last time can throw the ratio off more than it seems like it should.
Other Things a Rice Cooker Can Make
Rice cookers do more than most people give them credit for, which is kind of a shame considering how many just sit there only ever making white rice. A few things worth trying at least once: plenty of them include, or can be fitted with, a steamer basket that sits above the rice, so using a rice cooker with a steamer means cooking vegetables off the same rising steam that’s cooking the rice down below at the same time. Quinoa, oats, barley — they all work fine too, using a fairly similar liquid-to-grain ratio, so the appliance earns its keep well beyond just rice alone.
Models with a manual or “soup” setting can handle a basic one-pot soup, though this tends to work better on a fancier cooker than the bare on/off type. Some people go even further and layer rice, a protein, and vegetables together into one combined dish — getting the timing right for every ingredient takes a bit of trial and error, sure, but it’s doable with a little patience. And for leftovers, a splash of water plus a short cook cycle (or the steam setting, if there’s one) brings rice back closer to fresh, without drying it out the way a microwave usually does.
None of this needs any extra equipment beyond what most rice cookers already come with, which makes the appliance a decent stand-in for a small steamer or slow cooker when counter space — or time — is tight.
Troubleshooting Common Rice Cooker Problems
Even with a solid handle on the whole process, things go sideways every now and then. Most of the time it traces back to one of a handful of usual suspects:
| Problem | Likely Cause | Fix |
| Rice turns out mushy | Too much water for the rice type used | Cut back the water slightly next time; use the cooker’s own measuring cup |
| Rice is undercooked or hard | Not enough water, or the lid got opened mid-cycle | Add a splash of water and restart the cycle; keep the lid closed while it cooks |
| Rice sticks to the pot | Rice wasn’t rinsed, or the non-stick coating has worn down | Rinse the rice beforehand; switch to plastic or wooden utensils only |
| Rice smells burnt | Water ratio ran too low, or there’s buildup on the heating plate | Double-check the ratio; inspect and clean the heating element |
| Cooker won’t start | Inner pot isn’t seated right, or a safety lock is engaged | Remove and reseat the pot fully; make sure the lid is closed and locked |
Cleaning and Maintenance
A rice cooker doesn’t really ask for much upkeep, if we’re being honest. A few habits keep it running well for longer, though: always unplug it and let it cool down completely before cleaning, and hand-wash the inner pot instead of tossing it in the dishwasher or scrubbing at it with something abrasive — most pots have a non-stick coating that scratches way more easily than people expect.
It’s also worth wiping down the heating plate and sensor area — visible once the inner pot’s pulled out — with a slightly damp cloth every so often. Buildup there is an easy one to miss, and it’s a common reason for uneven cooking down the road that nobody thinks to check. Dry everything thoroughly before putting it away, and leave the lid cracked open rather than sealed shut, so moisture and odor don’t get trapped inside overnight.
Frequently Asked Questions
Do I have to rinse rice before cooking it?
Nope, it’s optional. Generally worth doing for texture, though — it washes away surface starch that would otherwise make the rice stickier and gummier than it needs to be. One exception: rice labeled “no-rinse” or pre-washed can go straight into the pot, no rinsing needed.
Can I leave rice on the “keep warm” setting overnight, or should I switch it to cook again the next day?
For a few hours, keep-warm is totally fine. Quality starts slipping somewhere around the 8-to-12-hour mark, though — both texture and taste take a hit. Better to just refrigerate anything that won’t get eaten soon rather than leaving it warming all night long.
Why does my rice always turn out mushy or hard?
Almost always comes back to the water ratio, one way or the other. Too much water and it’s mushy; too little — or a lid that got opened mid-cook — and it’s hard or undercooked. The ratio chart above is really the first place worth checking when something’s off.
Can I cook anything besides rice in a rice cooker?
Yes, actually. Plenty of rice cookers handle other grains like quinoa and oats just fine, using a fairly similar water ratio, and models with a steamer insert can cook vegetables at the same time as the rice underneath.
How to use a rice cooker for the first time — is there anything different about the first batch?
Not really, though it’s worth running one plain batch first just to get a feel for how the machine signals “done” and how long a full cycle actually takes on that particular model. Some new cookers also benefit from a first rinse-and-dry cycle with no rice in it at all, just to clear out any manufacturing residue — worth a quick check of the manual for anything model-specific there.
How long does it actually take to cook rice in a rice cooker?
White rice usually runs 20 to 25 minutes. Brown rice takes a fair bit longer, more like 40 to 50 minutes, thanks to its tougher outer bran layer that just takes more time to soften. Add the recommended 10 to 15 minutes of resting time afterward for the best texture overall.
Is it safe to use a rice cooker every day?
Yes, completely. These things are built for daily use, and the automatic switch to keep-warm arguably makes them safer than stovetop cooking — no risk of a forgotten pot boiling dry unattended on a burner somewhere. Regular cleaning of the pot and heating plate is really the only maintenance that matters in the long run.
Final Thoughts
Using a rice cooker well isn’t complicated once the pattern clicks — and it does click, usually pretty fast. Measure with the right cup, match the water to whatever rice is going in, close the lid and just walk away, then give it a short rest before anyone serves it up. The ratio chart and troubleshooting table above cover the details that trip most people up, but the appliance itself handles the hard part — consistent, hands-off cooking — as long as those first few steps are actually in place from the start.
Most of the inconsistency people run into really comes down to one of two things: an unfamiliar ratio for a particular rice, or a habit like cracking the lid mid-cycle that quietly undoes all the machine’s automatic timing. Get those two under control, and it turns into one of the more forgiving tools in the entire kitchen. Hard to go far wrong with it once the basics are dialed in. For more kitchen appliance guides like this one, browse the rest of the Kitchen section.
Or head back to the homepage to explore guides across every category.

