
How to use PowerPoint in a nutshell: open PowerPoint, pick Blank Presentation or a template, add your slides, type the text, drop in a few pictures or charts, and save the file. Press F5 (or the Slide Show button) when it’s time to present. No paid app? A free version runs in any web browser with a Microsoft account.
Most people meet PowerPoint the night before something’s due. A blank slide, a cursor blinking at nothing, and no clue where the buttons went. It’s a rough start, and it’s the reason so many first decks end up as walls of text. This guide goes slower. First, what PowerPoint is and how to get it free. Then the screen, then building a deck step by step. Design tips, the 5-5-5 rule, presenting, student examples and the usual mistakes come last.
Quick Takeaways
- PowerPoint for the web is free. The desktop app is part of Microsoft 365, so that one costs money.
- Every deck starts one of two ways: Blank Presentation or a template.
- One idea per slide. Five ideas on one slide is how decks go wrong.
- F5 starts the show. Esc stops it.
- The 5-5-5 rule helps catch crowded slides, but it’s a guideline, nothing more.
What Is Microsoft PowerPoint and What Is It Used For?
PowerPoint is Microsoft’s tool for making presentations. A deck is just a stack of slides, each one holding text, pictures, charts or video, and the whole thing gets shown on a screen while a person talks.
Classrooms use it constantly. Offices too, mostly for pitches, updates and training. Some people push it past presentations and use it for portfolios, handouts, photo albums, even a quick poster when nothing else is handy. And anyone who’s spent time in Word or Excel will recognize the ribbon along the top right away. That helps. A new program feels less scary when part of it looks familiar. New to Excel too? Our guide on how to use Excel is a good place to start.
Ways to Use PowerPoint: Free, Online, Laptop and Mobile
Not everyone has the same version. Some people don’t have any. So, the routes.
PowerPoint for the Web (Free)
The easiest free option lives in a browser. Microsoft’s own page says PowerPoint for the web is free for anyone to use online, and it supports editing with other people at the same time. Sign in with a free Microsoft account, open PowerPoint, start a blank presentation. No installing.
It’s the lighter version, though. Some desktop features are missing or limited, which is why Microsoft publishes a feature comparison page. For learning the basics? More than enough.
PowerPoint on a Laptop or Computer
The full desktop app comes with a Microsoft 365 subscription, on Windows and Mac. It works offline, copes better with big files and has every feature. Anyone searching “PowerPoint presentation download” usually means one of two things: the app, or a template. Microsoft covers both. Before paying for anything, check what’s already on the machine. Plenty of laptops, schools and workplaces include it.
PowerPoint Through School or Work
A lot of schools and employers already pay for Microsoft 365, so students and staff can often install PowerPoint for nothing. One short message to the IT desk answers it.
PowerPoint on Mobile
There are phone and tablet apps too. They’re fine for opening a deck, fixing a typo or presenting in a pinch. Building a whole presentation on a small screen, though? Not fun. Most people treat mobile phones as the backup plan.
Quick Comparison
| Version | Cost | Best for | Main limitation |
| PowerPoint for the web | Free with a Microsoft account | Learning, quick edits, sharing | Fewer advanced features, needs internet |
| Desktop app | Paid (or provided by school/work) | Big decks, offline use | Needs installing |
| Mobile app | Free for basic use | Viewing and light edits | Small screen |
A note on extras. Design Ideas shows up for Microsoft 365 subscribers, and Copilot needs its own license on top. Plans change, so Microsoft’s official pages are the place to confirm what’s included.
How Do I Start PowerPoint?
Open PowerPoint on the desktop, or sign in to the web version. Microsoft’s steps are short: select New, then pick Blank Presentation to build from scratch, or choose a ready-made template. There’s also a Take a Tour option for first-timers.
Templates help when design isn’t a strong suit. Blank works better when a presentation needs its own look. Whichever it is, save right away. Ctrl+S, a sensible file name, and a folder that’s easy to find next week.
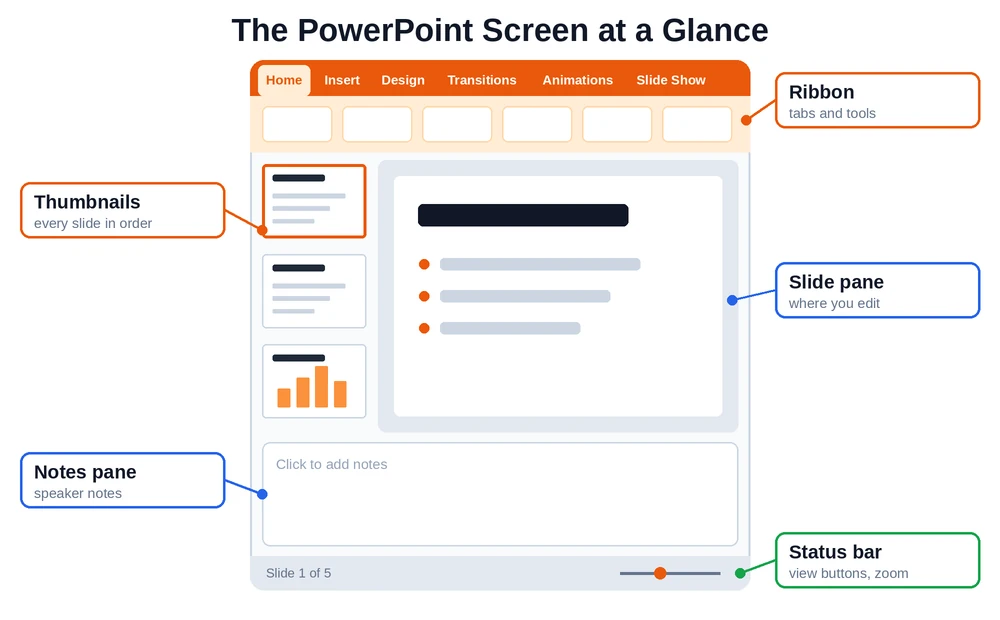
Understanding the PowerPoint Screen
It looks busy at first. Only a few parts really matter.
| Part | What it does |
| Slide thumbnails | A column on the left showing every slide in order |
| Slide pane | The big middle area where editing happens |
| Ribbon | The toolbar of tabs across the top |
| Notes pane | A strip below the slide for speaker notes |
| Status bar | The bottom strip with view buttons and zoom |
The Ribbon Tabs
Home holds fonts, bullets and the New Slide button. Insert is for pictures, shapes, charts and icons. Design controls themes and colors. Transitions and Animations handle motion. Slide Show starts the presentation. Learn those five and the rest can wait.
Views
Normal view is for building slides. Slide Sorter shows every slide as a grid, which is great for reordering. Notes Page and Reading view exist too, and Digital Trends’ walkthrough lists Normal and Notes Page among the main ones. Most beginners camp in Normal and hop to Slide Sorter when the order needs fixing.
How To Use PowerPoint Step by Step (Beginners)
Forget the grand project. Make something tiny. Five slides about yourself, or a short class assignment. Every step below follows that.
Step 1: Start With Blank or a Template
File > New. Blank Presentation or a template, take your pick. Blank means building it all from nothing. A template means somebody else already did the styling. Neither is wrong.
Step 2: Fill in the Title Slide
Slide one has two boxes. Title on top, subtitle underneath. Click in and type. Keep it short, honestly. A topic and a name is all it needs.
Step 3: Add New Slides and Pick Layouts
Home tab, then the Slides section, then New Slide. The Layout button picks the structure, like Title and Content or Two Content. Microsoft’s guide adds one small thing: click the slide in the thumbnails that the new one should come after. Faster option? Ctrl+M. No mouse needed.
Step 4: Add Text, Bullets and Notes
Click a text box. Type. The Font section on the Home tab handles size, bold and color, and bullets and numbered lists sit right beside it. Speaker notes go in the Notes pane below the slide. The audience never sees them, which is the whole point.
Step 5: Insert Pictures, Shapes and Charts
Insert tab. Pictures are under Images. Shapes, Icons, SmartArt and Chart are in Illustrations. A slide full of numbers? Turn it into a chart. It’ll say more in less time.
Step 6: Apply a Theme or Design Ideas
The Design tab has themes, and one click sets matching colors and fonts. Subscribers also get Design Ideas, which, according to Microsoft, proposes new looks built from the words typed on the slide. Pick one theme. Stay with it. Changing halfway through just looks messy.
Step 7: Add Transitions and Animations (Lightly)
Transitions decide how one slide slides into the next. Animations move stuff around on a single slide. A plain fade covers most needs. Spins and bounces? They steal attention from whoever’s talking.
Step 8: Save, Export and Share
Ctrl+S saves a .pptx. Need a copy nobody can edit? File > Export or Save As, then pick PDF. A OneDrive link works too, and it’s the easy move for group projects where everyone needs the latest version.
How To Make a PowerPoint Presentation Attractive
Good-looking slides aren’t about clever tricks. They’re about holding back.
- Pick two fonts at most. One for titles, one for body text.
- Make text big. If it’s hard to read from the back of a room, it’s too small.
- Use white space. Empty areas help the eye. They’re not wasted.
- Choose a small set of colors. Two or three, used the same way on every slide.
- Use real pictures. Sharp photos beat clip art. A blurry image does more harm than no image.
- Line things up. The alignment tools on the Shape Format tab are there for a reason, and crooked boxes get noticed.
- Stay consistent. Same layouts, same positions, same style from first slide to last.
Designer and Copilot
Two helpers come up a lot. Designer (Design Ideas) suggests layouts for slides that are already written, and it’s tied to a Microsoft 365 subscription. Copilot can draft slides and images, but it needs its own license, and Microsoft notes that some newer web features depend on Copilot licensing. Neither one is needed for a good deck. A missing button shouldn’t put anyone off.
What Is the 5-5-5 Rule in PowerPoint?
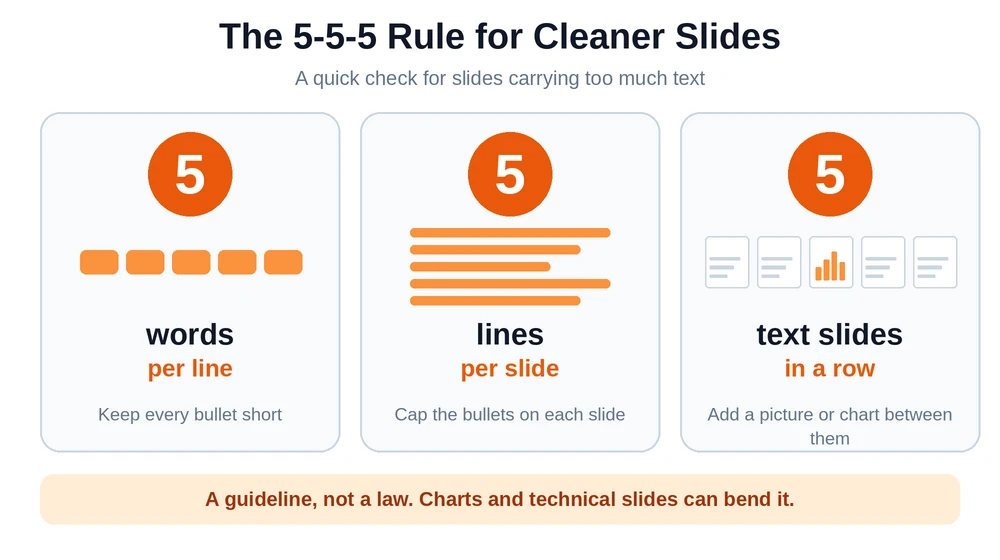
Think of it as a quick test for slides that have gotten out of hand. One popular version says keep it to 5 bullet points a slide, 5 words a bullet, and no more than 5 text-heavy slides back to back.
It’s a guideline, though, not a law. For pitches, class lessons and everyday talks, it works well. Technical slides and data-heavy ones are different, because they sometimes need more words, and that’s fine. When a slide really does need more, go ahead and break the rule on purpose. Then slip a picture or a chart in after it, so the audience gets a breather before the next wall of text.
How To Present: Slide Show, Presenter View and Shortcuts
Start the Show
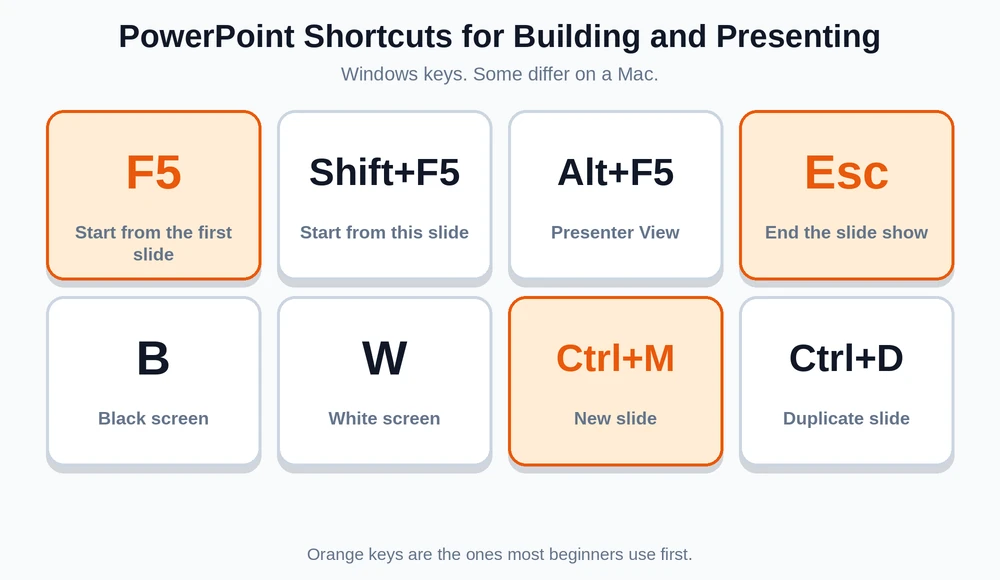
Press F5 to run the slide show from the first slide, or Shift+F5 to begin from the current one. The Slide Show tab has buttons for both. Esc ends it.
Presenter View
Presenter View lets the speaker see notes, a timer and the next slide while the audience sees only the current one. On a single monitor, Zapier’s trick is to start the show, click the three dots, and choose Use Presenter View. On Windows, Alt+F5 starts it too. Rehearsing with Speaker Coach, which Digital Trends mentions, is a good way to work on pacing.
Handy Shortcuts
| Shortcut | What it does |
| Ctrl+N | New presentation |
| Ctrl+M | New slide |
| Ctrl+D | Duplicate selected slide or object |
| F5 | Start from the first slide |
| Shift+F5 | Start from the current slide |
| B | Black screen (press again to return) |
| W | White screen (press again to return) |
| Esc | End the slide show |
Mac keys are different for some of these, and Computerworld’s shortcut roundup lists both versions side by side.
PowerPoint for Students, With Presentation Examples
For students, a few habits pay off most. Write the outline first. One idea per slide. Pictures come after. Put sources on the last slide, and read everything out loud once before the real thing.
Presentation Examples
| Type | A simple structure |
| School project | Title, question, three findings, conclusion, sources |
| Business pitch | Problem, solution, how it works, results, next steps |
| Book report | Cover, plot summary, characters, themes, opinion |
| Portfolio | About me, three best projects, skills, contact |
Each fits in five to eight slides. Short usually wins.
How To Learn PowerPoint Easily
Pick a real presentation and build it. Learning menu by menu is slow, and the buttons make a lot more sense once there’s a reason to press them.
A rough estimate, since there’s no official number: a few hours of hands-on practice covers the basics, and somewhere around 10 to 20 hours makes most people comfortable. That’s just an estimate, and it swings a lot from person to person.
A simple practice plan:
- Day 1: open PowerPoint, learn the screen, save a file.
- Day 2: add slides, layouts and text.
- Day 3: pictures, shapes and a chart.
- Day 4: themes and clean formatting.
- Day 5: present it out loud, with F5 and speaker notes.
Microsoft’s own training pages and short video lessons make decent companions. Videos are great for seeing where to click. A written guide is better for looking things up later.
Common Beginner Mistakes (and Easy Fixes)
- Too much text. If a slide reads like a paragraph, split it.
- Tiny fonts. Bigger is almost always better.
- Clashing colors. Stick to a theme.
- Too many animations. One simple effect is plenty.
- Reading slides word for word. The slides back up the talk. They’re not the talk.
- Forgetting to save. Ctrl+S. Again.
- Skipping the rehearsal. One practice run catches most problems.
Frequently Asked Questions
How to use MS PowerPoint step by step?
Start with a Blank Presentation. Type a title. Add a slide, pick a layout, type the text, then repeat until the deck is done. Pictures and charts come from the Insert tab. Pick a theme so the slides match, save with Ctrl+S, and press F5 to see it full screen.
What are the 5 5 5 rules of PowerPoint?
It’s a slide diet. Five words a line, five lines a slide, and never more than five text-heavy slides back to back. Handy for catching a slide that’s gotten out of hand. Charts and technical slides? They break it all the time, and that’s fine.
How do I learn PowerPoint for beginners?
Make something. Five slides about a topic you already know is plenty. Along the way, layouts, text, one picture and one chart stop being scary, and that’s most of what a beginner needs. Short sessions most days work better than one big weekend push.
Is it easy to use PowerPoint?
The software is. Anyone who’s used Word can find their way around quickly. What’s hard is deciding what goes on each slide and then saying it out loud without freezing. That’s practice, not buttons.
What are 5 benefits of using PowerPoint?
Ideas become pictures instead of paragraphs. Templates and themes handle a lot of the design. Groups can edit one deck at the same time. It exports to PDF and other formats. And it has speaker tools, like Presenter View and notes, that make the live part easier.
How many hours to learn PowerPoint?
Honestly, there’s no official number, so this is just a guess. A few hours of practice will get you through the basics. Getting comfortable usually takes around 10 to 20 hours. Someone who makes a presentation every week will learn faster than someone who opens PowerPoint twice a year.
Is PowerPoint a hard skill?
Yes, it’s considered one. In job-skill terms, anything tied to software falls into the hard-skill category. Don’t let the name trick you, though. “Hard” here just means technical, and PowerPoint is one of the easier ones to learn. What actually takes effort is knowing what to put on a slide and then standing up to present it. Those parts lean closer to soft skills.
Which is better, PowerPoint or Canva?
It depends on what matters to you. PowerPoint is better if you need to work offline, want control over every element, or plan to use Presenter View with notes. Canva is quicker if you want slides that look good right away, all inside a browser. Both have free versions. Curious about the other side? Our guide on how to use Canva is a good place to start. Or build the same small deck in each, maybe three slides, and see which one makes you grumble less.
What is the best way to learn PowerPoint?
Build a presentation and then actually give it, even if it’s just to a friend or a mirror. Videos show you where to click. A written guide is better when you need to look something up. Honest feedback from one person beats another hour of watching tutorials.
Final Thoughts
Learning how to use PowerPoint comes down to a handful of habits. Start from a blank deck or a template. Keep one idea per slide. Use big text and a small set of colors. Then practice the talk, because slides never present themselves.
Menus, plans and features change as Microsoft updates the program, so Microsoft’s official support pages are the best place to confirm the latest details for a specific version.
For more free step-by-step software guides like this one, visit The How To Use.
Sources consulted: Microsoft Support (Create a presentation in PowerPoint) and Microsoft’s PowerPoint page, Zapier, Digital Trends, Computerworld, Piktochart and SlidesAI. All content was written independently in original wording.